


Flutter is booming nowadays, especially in the mobile app development world, Flutter is very rich in UI perspective and there are many built-in widgets (Components) that are very easy to use and manage.
But when it comes to state management or data management, there are many ways to do it just like in any other framework.
The Provider is one of the ways to do it, by using provider it can guarantee you:
- Maintainability for the structure of your code
- Easy to maintain data and state throughout the development
- Very useful when working with Future and Streams
- Avoid Re-building UI on every action, by using Consumers you can achieve this magic.
The Provider Architecture
So how the provider actually works, let’s take a look.


From the above diagram we have:
- The root of our App (MyApp) and it has 3 children (Child One, Two and Three).
- Then, MyApp will connect to another class i.e. State/Data Provider (Where all magic happens).
- This class has many listeners or you can say services according to your app which will listen to MyApp and it’s children.

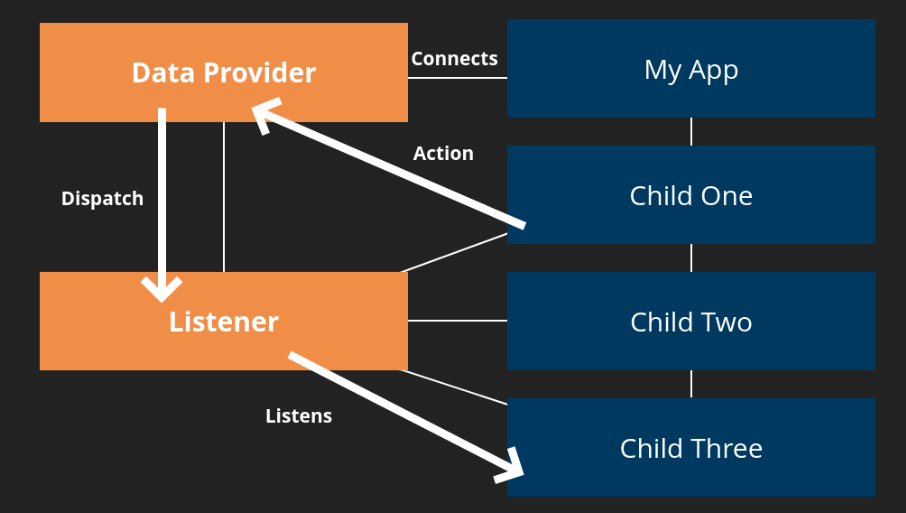
For Example, an action is dispatched or called from Child One, then it will go to our Provider Class from which it will call listeners to notify their children that this action is called you have to make changes accordingly, so whoever the child is listening to that will make a change accordingly.
So this is how Provider actually works :).
That’s a lot of theory now we will take a look at how Provider works when it comes to development.


The Development Part
First, we have lib/main.dart:
import 'package:flutter/material.dart';

void main() => runApp(MyApp());

class MyApp extends StatelessWidget {
  @override
  Widget build(BuildContext context) {
    return MaterialApp(
      debugShowCheckedModeBanner: false,
      home: HomeScreen(),
    );
  }
}

class HomeScreen extends StatelessWidget {
  final TextEditingController valueController = TextEditingController();
  @override
  Widget build(BuildContext context) {
    return Scaffold(
      appBar: AppBar(
        title: Text('Voting App'),
        centerTitle: true,
      ),
      body: Container(
          child: Column(
        children: <Widget>[
          TextField(
            controller: valueController,
          ),
          RaisedButton(
            onPressed: () {
              // add items service will call here
            },
            child: Text('Add Items'),
          ),
        ],
      )),
    );
  }
}
in which I have a column and it has two children a text field and a button that will add items to our list.


Now we will add the Provider library in our project by including it in pubspec.yaml, a file in your project root, head over to Pub.dev and copy the provider key from installing tab and paster it into pubspec.yaml
dependencies:
  flutter:
   sdk:flutter
  provider: ^4.0.4
then run flutter pub get command to get all packages you’ve inserted.
The Provider Class
Now make a new file named VotingProvider.dart in lib folder and add the following code:
import 'package:flutter/foundation.dart';

class VotingProvider extends ChangeNotifier {
  List _votingData = [];

  List get getData => _votingData;

  void incrementVotes(int index) {
    _votingData[index]['votes']++;
    notifyListeners();
  }

  void addItem(String value) {
    _votingData.add({'title': value, 'votes': 0});
    notifyListeners();
  }
}
On line 1, I have imported the foundation library provided by flutter itself, it gives us the ChangeNotifier class which notify every child of the app to listen to changes and manage data accordingly.
I have added some services like getData it will return us the list of data, and incrementVotes function that will increment vote counter and addData function which will add items in our list, every function and notifylisteners() method called at it will do the magic and notify all its children where this service will be used.
Connect Provider to our App
import provider library and our Voting Provider in lib/main.dart.
import 'package:provider/provider.dart’;
import './VotingProvider.dart’;
... some code
 home: ChangeNotifierProvider.value(
   value: VotingProvider(),
   child: HomeScreen(),
)
Now wrap your HomeScreen widget to ChangeNotifierProvider class, this class is basically the which connect our single provider to our App.
Now at HomeScreen widget and in build method add following code:
Widget build(BuildContext context) {
final dataProvider = Provider.of<VotingProvider>(context);
return Scaffold(
...some code
This is how we will use our Provider class in our Home Screen, now this dataProvider variable has access to all methods and variables of VotingProvider class.
Now we will call our add items service to our button that we made earlier.
RaisedButton(
 onPressed: () {
  if(valueController.text.isNotEmpty) {
   dataProvider.addItem(valueController.text);
  }
 },
 child: Text('Add Items’),
),
Now we will add the third child in our column is ListView which will iterate through our data and show on UI.
Expanded(
  child: ListView.builder(
           itemCount: dataProvider.getData.length,
           itemBuilder: (_, index) => Card(
           elevation: 5,
           child: ListTile(
              onTap: () {
                data.incVotes(index);
              },
            title: Text('${dataProvider.getData[index]['title’]}’),
            trailing: CircleAvatar(
            child: Text('${dataProvider.getData[index]['votes’]}’),
              ),
           ),
       ),
   ),
)
ListTile has onTap attribute which increments our votes on the list item.
All the data and services come from a dataProvider variable which is our Provider class,
As you can see all of our services are in separate files and UI is separate, which is able to maintain our code structure.
So this is our final app.


Do check out this video in which I have also give the tutorial on Consumers and how they are effective in your App
Provider Tutorial: youtube.com/watch?v=iEuT21t1qqc
Full Code on Github: https://github.com/Huzaifaahmed20/Flutter-Provider-Tutorial
YouTube Channel (LivDev): https://www.youtube.com/channel/UCLKS-qC6EvlE7bayfQsWPFw?view_as=subscriber
Good Bye :)